(Swift2) Alamofire の upload の進捗を通知で受け取ってプログレスバーを表示する
Swift2.2, Xcode7
前回の記事で Alamofire の upload メソッドの API クライアントを作成しました。
(Swift2) Alamofire の upload 用 API クライアントを作成する
今回は upload 用の API クライアントに手を加えて、ファイルのアップロードの進捗をプログレスバーに表示したいと思います。
- Alamofire の upload.progress メソッドに通知を設定する ( API.swift )
- API.call の Start と End で通知を設定する
- View と ViewController で通知を受け取って、プログレスバーの View を表示する ( UploadProgressUIView.swift )
1. Alamofire の upload.progress メソッドに通知を設定する ( API.swift )
Alamofire がプログレス表示用のメソッドを用意してくれているので、それを利用することで簡単に進捗を確認することができます。
以前作成した API.swift に .progress メソッドを追加します。
・ API.swift
class func call<T: UploadProtocol, V where T.ResponseType == V>(request: T, completion: (Result<V, NSError>) -> Void){
    Alamofire.upload(
        request.method,
        request.baseURL + request.path,
        headers: request.headers,
        multipartFormData: request.multipartFormData,
        encodingCompletion: { encodingResult in
            switch encodingResult {
            case .Success(let upload, _, _):
                upload.progress { (_, totalBytesWritten, totalBytesExpectedToWrite) in
                    let progress: Float = Float(totalBytesWritten) / Float(totalBytesExpectedToWrite)
                    NSNotificationCenter.defaultCenter().postNotificationName("UploadProgressNotification", object: nil, userInfo: ["progress": progress])
                }
                upload.responseJSON { response in
                    ....
2. API.call の Start と End で通知を設定する
アップロードリクエストの Start と End を通知で受け取れる用に API を call に通知の設定をします。
let image = UIImage(named: "test")
let humanQuality: CGFloat = 0.8
let imageData = UIImageJPEGRepresentation(image, humanQuality)

NSNotificationCenter.defaultCenter().postNotificationName("UploadStartNotification", object: nil)
API.call(Endpoint.UploadPhoto(imageData: imageData)) { response in
    NSNotificationCenter.defaultCenter().postNotificationName("UploadCompleteNotification", object: nil)
    switch response {
    case .Success(let result):
        print("success \(result)")
    case .Failure(let error):
        print("failure \(error)")
    }
}
3. View と ViewController で通知を受け取って、プログレスバーの View を表示する ( UploadProgressUIView.swift )
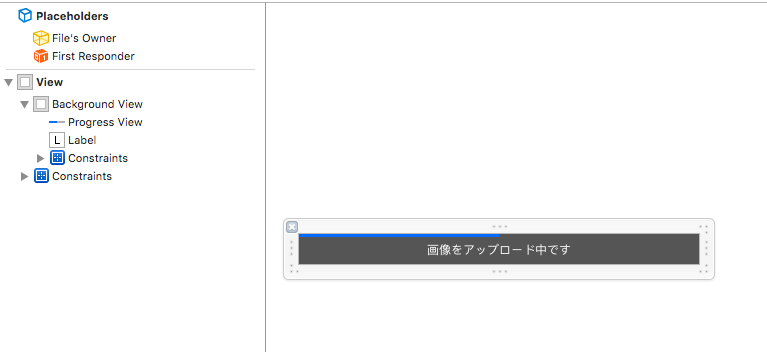
UploadProgressNotification の通知を受け取って、プログレスバーを更新する View を作成します。複数画面で使い回せるように Xib ファイルを利用しました。Xib ファイルの呼び出し方についてはこちらの記事がとても参考になりました。 カスタムViewをNibから初期化し、IBDesignableとIBInspectableで便利に使う
・ UploadProgressUIView.xib

・ UploadProgressUIView.swift
class UploadProgressUIView: UIView {
    @IBOutlet weak var progressView: UIProgressView!

    override init(frame: CGRect) {
        super.init(frame: frame)
        self.initialize()
    }

    required init?(coder aDecoder: NSCoder) {
        super.init(coder: aDecoder)
        self.initialize()
    }

    deinit {
        NSNotificationCenter.defaultCenter().removeObserver(self)
    }

    func initialize() {
        guard let view = self.settingXib() else {
            return
        }
        self.addSubview(view)
        self.layoutXib(view)
        self.progressView.setProgress(0, animated: false)
        NSNotificationCenter.defaultCenter().addObserver(self, selector: #selector(self.setProgress(_:)), name: "UploadProgressNotification", object: nil)
    }

    func setProgress(notification: NSNotification) {
        guard let progress = notification.userInfo?["progress"] as? Float else {
            return
        }
        // progressBar の更新はメインスレッドで実行する必要があり、
        // notification による通知の受信はメインスレッドで実行されない為
        // main_queue でメインスレッドにして実行する必要がある
        dispatch_async(dispatch_get_main_queue()) {
            self.progressView.setProgress(progress, animated: true)
        }
    }

    private func settingXib() -> UIView? {
        let bundle = NSBundle(forClass: self.dynamicType)
        let nib = UINib(nibName: "UploadProgress", bundle: bundle)
        guard let view = nib.instantiateWithOwner(self, options: nil).first as? UIView else {
            return nil
        }
        return view
    }

    private func layoutXib(view: UIView) {
        view.translatesAutoresizingMaskIntoConstraints = false
        let bindings = ["view": view]
        addConstraints(NSLayoutConstraint.constraintsWithVisualFormat("H:|[view]|",
            options:NSLayoutFormatOptions(rawValue: 0),
            metrics:nil,
            views: bindings))
        addConstraints(NSLayoutConstraint.constraintsWithVisualFormat("V:|[view]|",
            options:NSLayoutFormatOptions(rawValue: 0),
            metrics:nil,
            views: bindings))
    }
}
UploadProgressUIView を表示したい ViewController では upload の start と end の通知を受け取って UploadProgressUIView の addSubview と removeFromSuperview を行います。 NavigationBar の下に表示するようにしています。
class UploadViewController: UIViewController {
    private let uploadProgressView = UploadProgressUIView()

    override func viewWillAppear(animated: Bool) {
        super.viewWillAppear(animated)
        NSNotificationCenter.defaultCenter().addObserver(self, selector: #selector(self.addUploadProgressView), name: "UploadStartNotification", object: nil)
        NSNotificationCenter.defaultCenter().addObserver(self, selector: #selector(self.removeUploadProgressView), name: "UploadCompleteNotification", object: nil)
    }

    override func viewWillDisappear(animated: Bool) {
        super.viewWillDisappear(animated)
        NSNotificationCenter.defaultCenter().removeObserver(self)
    }


    func addUploadProgressView() {
        self.uploadProgressView.alpha = 1
        self.view.addSubview(self.uploadProgressView)
        self.settingProgressView()
    }

    func removeUploadProgressView() {
        UIView.animateWithDuration(3, animations: {
            self.uploadProgressView.alpha = 0
        }, completion: { finished in
            self.uploadProgressView.removeFromSuperview()
        })
    }

    private func settingProgressView() {
        guard let navigationBarHidden = self.navigationController?.navigationBarHidden else {
            return
        }
        guard !navigationBarHidden else {
            return
        }
        let constraints = UIUtility.topLayoutGuideAutoLayoutItem(self.uploadProgressView, viewController: self)
        self.view.addConstraints(constraints)
        self.uploadProgressView.translatesAutoresizingMaskIntoConstraints = false
        self.view.bringSubviewToFront(self.uploadProgressView)
    }
struct UIUtility {
    static func topLayoutGuideAutoLayoutItem(item: UIView, viewController: UIViewController) -> [NSLayoutConstraint] {
        let top = NSLayoutConstraint(
            item: item,
            attribute: .Top,
            relatedBy: .Equal,
            toItem: viewController.topLayoutGuide,
            attribute: .Bottom,
            multiplier: 1.0,
            constant: 0
        )

        let width = NSLayoutConstraint(
            item: item,
            attribute: .Width,
            relatedBy: .Equal,
            toItem: nil,
            attribute: .Width,
            multiplier: 1.0,
            constant: UIScreen.mainScreen().bounds.width
        )
        return [top, width]
    }
}